April 14th, 2026 | 15 min. read
Learn how to find the perfect grilling products with our BBQ Buying Guide


TL;DR: 12 Steps to Designing Your Outdoor Kitchen in 2026
The difference between an outdoor kitchen you use and one you regret usually comes down to planning. Build your layout around the grill, lock in utilities and ventilation before construction starts, choose outdoor-rated appliances and materials proven for your climate, and add only the features that match how you actually cook and entertain.
You can spend $25,000 to $50,000 on an outdoor kitchen and still end up with something you barely use.
It happens all the time. Usually, the problem is not the grill. It is the layout, ventilation, materials, or using products that were never meant to survive a New England winter.
Most people start with the look. That is the mistake.
An outdoor kitchen is not an indoor kitchen moved outside. Indoors, the sink usually drives the layout. Outside, it should be the grill.
That one decision affects everything from prep space and utilities to ventilation, lighting, and traffic flow.
In this article, you will learn the 12 steps to build the right outdoor kitchen for your space, your family, and the way you cook.
What You Will Learn
-
How to plan your outdoor kitchen around the way you cook
-
When you need ventilation and what goes wrong when you get it wrong
-
Which grill type fits the way you actually cook
-
Which layouts work best in real backyards
-
What materials hold up to Boston winters, Cape humidity, and Nantucket salt air
Quick Answers
| Short Answer | |
| What should you design around first? | The grill, not the sink. |
| Do you need ventilation? | Only if the grill is covered or enclosed. If it is, do not underdo it. |
| What is the biggest outdoor kitchen mistake? | Building without a real plan. |
| What appliances do most people actually need? | A grill, prep space, storage, and sometimes refrigeration. |
| What materials work best outdoors in New England? | Dekton, granite, stainless steel, concrete, powder-coated aluminum, and marine-grade polymer. |
| Is custom always better than prefab? | No. Custom is better for unusual spaces. Prefab is often faster and less expensive. |
| What is the best layout for most people? | An island or L-shape. The right choice depends on your space and how you entertain. |
| Should I use indoor appliances outside? | No. Outdoor-rated products are built for weather, moisture, and temperature swings. Indoor products fail faster. |
| What is the cheapest way to avoid a major mistake? | Tape the layout on the ground and walk it before you build. |
Looking for answers about BBQ Grills?
Short on time? Download our free BBQ Buying Guide.
12 Steps to Designing Your Outdoor Kitchen in 2026
Step 1: Start With a Real Strategy
⚡ Quick Answer: Before choosing appliances or materials, define how you cook, how often you entertain, and how far the kitchen will be from the house.
The biggest outdoor kitchen mistake is building without a real plan.
Most people start with the fun stuff. They look at grills, countertops, stools, and photos online.
That is fine for inspiration. It is not a strategy.
A real outdoor kitchen plan starts with how you are going to use the space.
Are you grilling burgers for four on weeknights, or hosting 20 people on summer weekends?
Do you want a simple cooking area near the house, or a true second kitchen with refrigeration, cleanup, and storage?
Are you cooking full meals outside, or just adding a grill and some landing space?

If the kitchen is close to the house, you may not need much more than a good grill, prep space, and storage.
If it is farther away, like by the pool, you may want refrigeration, a sink, a side burner, or other support appliances so you are not running back and forth all night.
Then decide how far you want to take the project. It can be simple, semi-custom, or fully built out.
We will get into layouts later. Right now, the goal is to figure out what kind of outdoor kitchen you are really building.
What Should Be Part of Your Strategy
-
How often you cook outside
-
How many people you usually cook for
-
Whether the kitchen is near or far from the house
-
Whether you want quick grilling, slow smoking, or both
-
Whether you need refrigeration, cleanup, storage, or serving space
-
What your budget is before you fall in love with the wrong setup
What Can Go Wrong
-
Buying appliances before thinking through the layout
-
Overspending on features you will rarely use
-
Underbuilding the space for how you actually entertain
-
Forgetting utilities, winterization, and service access
Step 2: Decide Who Is Planning and Building It
⚡ Quick Answer: Assign a single project lead to coordinate the builder, electrician, plumber, and appliance specialist, especially in New England where outdoor kitchen experience varies widely.
A great outdoor kitchen usually involves more than one person.
The real question is who is leading the project and who owns each part of it.
That matters because outdoor kitchens involve a lot of trades. You may need a builder, mason, electrician, plumber, appliance specialist, and sometimes an architect or designer.

In warmer markets, outdoor kitchens are more routine. In New England, experience can vary a lot more.
That means you need to ask who has actually built these before. A good contractor is not always a good outdoor kitchen planner.
Of course, you can bypass the question by buying a weather-resistant, out-of-the-box grill island like Challenger or Urban Bonfire.
Who May Be Involved
-
Builder or general contractor for the overall project
-
Mason for the structure, stonework, or island base
-
Electrician for lighting, outlets, and refrigeration
-
Plumber for sinks, drainage, and gas coordination
-
Appliance specialist for grill selection, venting, and fit
-
Architect or designer for layout, flow, and integration with the house
What Can Go Wrong
-
No one is clearly in charge
-
The trades are not coordinated
-
The appliance specs come too late
-
The contractor has never built a real outdoor kitchen before
-
Utility planning gets left to the last minute
Ask to see real outdoor kitchen projects, not just pretty patio photos. Make sure one person owns the full plan before construction starts.
Step 3: Plan for Wind, Weather, and Exposure
⚡ Quick Answer: Site your grill and prep area based on prevailing wind, afternoon sun, and proximity to the coast to avoid smoke blowback, overheating, and premature corrosion.
Outdoor kitchens do not live in a showroom. They live in your yard.
That means wind, rain, direct sun, freezing weather, and in some areas salt air all affect what you should build and where you should put it.
Wind matters more than people think. Put the grill in the wrong spot, and smoke can blow back toward the house or right into the seating area.
Rain matters too. A beautiful setup is a lot less useful if you cannot cook when the weather turns.

Sun is another issue. Prep space in direct afternoon sun gets old fast, especially in July.
If you are building near the coast, materials matter even more. In places like Cape Cod and Nantucket, salt air can beat up the wrong stainless and shorten the life of your appliances.
What to Think About
-
Wind direction
-
Distance from the house
-
Whether the grill is exposed or covered
-
Afternoon sun on prep and seating areas
-
Salt air if you are near the water
-
How the space will hold up through winter
What Can Go Wrong
-
Smoke blowing back into the house
-
Prep and seating areas that are too hot to use
-
Rust and corrosion from the wrong materials
-
A kitchen that looks great in May and feels miserable by August
-
Weather exposure that shortens the life of your appliances
Walk the space at different times of day before you build. Pay attention to wind, sun, and how close you really want the kitchen to be to the house.
Step 4: Plan the Utilities Before You Build Anything
⚡ Quick Answer: Lock in gas, electric, water, and drainage routing early in the design phase. Retrofitting utility lines under a finished patio is one of the most expensive corrections.
This is where a lot of budgets go sideways.
If you want gas, electric, water, drainage, refrigeration, lighting, or a sink, those decisions need to happen before the patio is finished and before the cabinet layout is locked in.
Gas usually comes first. You need to know whether you are using natural gas or propane, and whether you want a side burner or power burner along with the grill.
Then comes electric. Outdoor kitchens usually need more power than people think.

You may need it for refrigeration, lighting, outlets, rotisserie motors, ignition systems, and other accessories. That gets missed all the time.
Water is next if you want a sink, ice maker, or dishwasher. In New England, that also means you need a winterization plan.
Drainage matters too. If water is part of the project, you need to know where it is going.
What to Plan For
-
Gas for grills, side burners, and power burners
-
Electric for refrigeration, lighting, outlets, and accessories
-
Water for sinks, ice makers, and dishwashers
-
Drainage for any plumbing
-
Winterization if the space includes water lines or seasonal appliances
What Can Go Wrong
-
No gas where the grill ends up
-
No outlet where you need refrigeration or task lighting
-
Plumbing with no shutoff or drainage plan
-
Ice makers added without thinking about maintenance
-
Utility lines planned after the design is already finalized
Plan the lines first. It is a lot cheaper to change a drawing than rip apart a finished patio.
Step 5: Plan the Lighting
⚡ Quick Answer: Budget for overhead task lighting at the grill and prep area plus accent LEDs on steps and railings. It is one of the cheapest upgrades with the biggest everyday impact.
Lighting gets missed all the time.
We used to sell lighting at Yale until 2019 for nearly 100 years, so this one hits close to home. Most people think a couple of outdoor fixtures will be enough.
Usually they are not. You need to see what you are cooking.

On a powerful professional grill, the difference between medium rare and well done can be a minute or two. You do not want to miss it because you cannot see the food.
The good news is lighting is one of the least expensive parts of the project. It does not take much of your budget to get it right.
Start with overhead lighting where you cook. That gives you the visibility you need at the grill and prep area.
Then add accent lighting to make the space more usable and inviting. Small LED lights on railings, steps, or under stairs are inexpensive and make a big difference.
What to Think About
-
Overhead lighting at the grill
-
Lighting over prep areas
-
Accent lighting on railings and steps
-
Safe lighting around stairs and walkways
-
Making the space functional, not just attractive
What Can Go Wrong
-
Not enough light where you cook
-
Harsh lighting in the wrong places
-
Dark stairs or walkways
-
Relying on one fixture to do everything
You do not need to spend a lot to light an outdoor kitchen properly. Make sure you have proper lighting at the grill. Then add accent lighting throughout the backyard to make the whole space feel finished.

Step 6: Do Not Underestimate Ventilation
⚡ Quick Answer: Open-air grills need no special ventilation, but any covered, roofed, or enclosed setup requires a properly sized hood and exhaust. Underpowering the vent is one of the costliest mistakes to fix.
If your grill is fully open to the outdoors, ventilation is simple. You usually do not need to worry about it.
If the grill is inside a three-season porch, under a roof, or enclosed near the house, that changes completely.
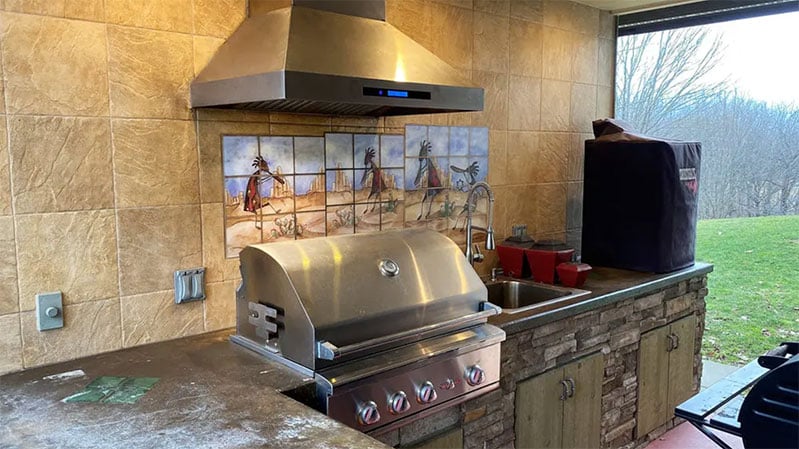
Ventilation is where people make some of the most expensive mistakes in an outdoor kitchen.
Years ago, a contractor asked me to look at the ventilation setup for a finished three-season porch. Just from the description, I knew it was wrong.

The architect, designer, homeowner, and even the chef were all there. Rather than argue, I brought some chicken sausage, fired up the grill, and smoked out the whole room.
Fixing it was not cheap. The contractor had to add a commercial hood and redo the chimney, and it cost about $35,000.
What to Think About
-
Whether the grill is fully outside or partially enclosed
-
Hood depth, not just blower power
-
Where the smoke and grease will actually go
-
Whether the space connects to the house
-
Whether a stronger commercial-style solution is needed
What Can Go Wrong
-
Smoke filling the room
-
Grease and odors drifting into the house
-
A beautiful porch that becomes unpleasant to use
-
Expensive rework after the project is already finished
A simple rule: if you are putting a grill under a cover, get the ventilation right. If you can leave it fully outside, you do not have to worry about it.
The mistake is in the middle. It is underpowering the vent. That is especially risky if the space is not closed off from the rest of the house.
🔍 Read More: How to Vent an Outdoor Grill
Step 7: Choose the Right Grill
⚡ Quick Answer: Place the grill at the center of your layout and let everything else flow around it. Pick gas for speed and convenience, pellet for smoking, or charcoal and kamado for maximum flavor.
The grill is the center of the outdoor kitchen. That is where you are going to be, so everything else should work around it.
That is also where people get distracted. They shop by pretty pictures showing the grill in different places.
Do not do that. Centralize the grill.
Now start with how you cook. In many cases, that matters more than the brand name.
If you want fast weeknight grilling and easy cleanup, a gas grill is usually your best choice. If you care more about smoke and flavor, charcoal, pellet, or kamado may make more sense.
Gas Grills
.jpg?width=799&height=450&name=LiveAbode-Features-Hestan-Outdoor-Built-In-Grills%20(1).jpg)
Gas grills are the easiest choice for most people. They heat fast, are simple to use, and work well for everyday cooking.
The downside is flavor. They do not give you the same smoke profile as charcoal, pellet, or kamado.
Pellet Grills
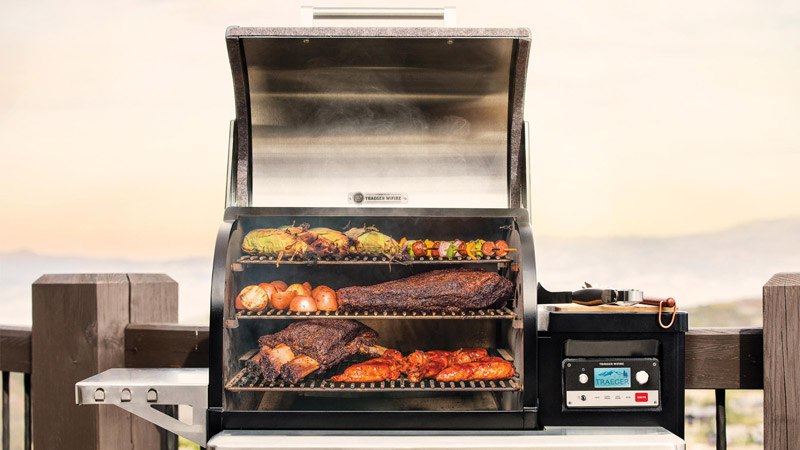
Pellet grills are great for smoking and longer cooks. They give you better flavor and better temperature control than most people expect.
The drawback is heat. Pellet grills are not the best choice if you want one grill for quick, high-heat cooking because they do not reach the same temperatures as other grills.
Charcoal and Kamado Grills

These are for people who care most about flavor. They can be great, but they take more time, more cleanup, and more patience.
That is the trade-off. Better flavor usually means more work.
What to Think About
-
How often you grill
-
Whether you want speed or flavor
-
How much cleanup you are willing to deal with
-
Whether this is your only cooker or part of a bigger setup
-
How the grill fits into the rest of the layout
What Can Go Wrong
-
Picking a grill based on looks instead of cooking style
-
Putting the grill in the wrong place
-
Buying a pellet grill when you really want quick high-heat grilling
-
Expecting one grill to do everything well
Centralize the grill. Then choose the type based on how you cook, not the name on the lid.
🔍 Read More: The Best BBQ Grills, Griddles, and Smokers
Step 8: Add Only the Support Appliances You Will Actually Use
⚡ Quick Answer: Let distance from your indoor kitchen guide your choices. A nearby setup may only need storage and landing space, while a poolside build benefits from refrigeration, a sink, and a side burner.
This is where outdoor kitchens can get bloated fast. You do not need every accessory.
You need the support appliances that make sense for how far the kitchen is from the house and how you actually cook.
If the outdoor kitchen is close to the house, you may not need much more than a grill, landing space, and storage.
If it is farther away, a refrigerator, sink, side burner, or warming drawer may make a lot more sense.
Refrigeration is one of the most useful additions. It keeps drinks, meat, and prep ingredients outside so you are not walking back and forth all night.

A sink can also be worth it if the outdoor kitchen is far from the house. It gives you a place to rinse, clean up, and handle prep without leaving the space.
Side burners are useful if you actually cook full meals outside. They are especially good for sauces, sides, lobster, or corn.
Warming drawers can help if you entertain a lot. They keep food ready without forcing you to serve everything at once.

Pizza ovens, ice makers, beverage centers, and other extras can be great. Just buy what you will use.
What to Think About
-
How far the kitchen is from the house
-
Whether you cook full meals outside or just grill
-
Whether you entertain often
-
Which appliances will save you the most trips inside
-
Which additions are worth the utility and maintenance requirements
What Can Go Wrong
-
Adding appliances you will barely use
-
Forgetting water, drainage, or electric requirements
-
Buying indoor products for outdoor use
-
Spending too much on extras before the basics are right
Add the support appliances that make the space easier to use. Just buy what you will use.
Step 9: Use Outdoor-Rated Appliances Only
⚡ Quick Answer: Always verify an appliance carries an outdoor rating before installing it. Indoor units lack the weatherproofing and corrosion resistance to survive temperature swings, moisture, and New England winters.
This should be obvious, but it gets missed all the time.
If an appliance is going outside, it needs to be rated for outdoor use.

Indoor products are not built for heat, cold, moisture, and temperature swings. They may work for a while, but they usually fail faster and can void the warranty.
Outdoor-rated products are built differently. They use better materials and are designed to handle weather, humidity, and changing temperatures.
This matters even more in New England. Between winter, rain, and salt air near the coast, the wrong product does not last long.
What to Think About
-
Whether the product is actually rated for outdoor use
-
How it will handle heat, moisture, and winter weather
-
Whether it is installed in a covered area or exposed space
-
What maintenance it will need over time
What Can Go Wrong
-
Rust and corrosion
-
Early product failure
-
Warranty problems
-
Poor performance in extreme temperatures
If it is going outside, buy an outdoor-rated product. This is not the place to try to save money the wrong way.
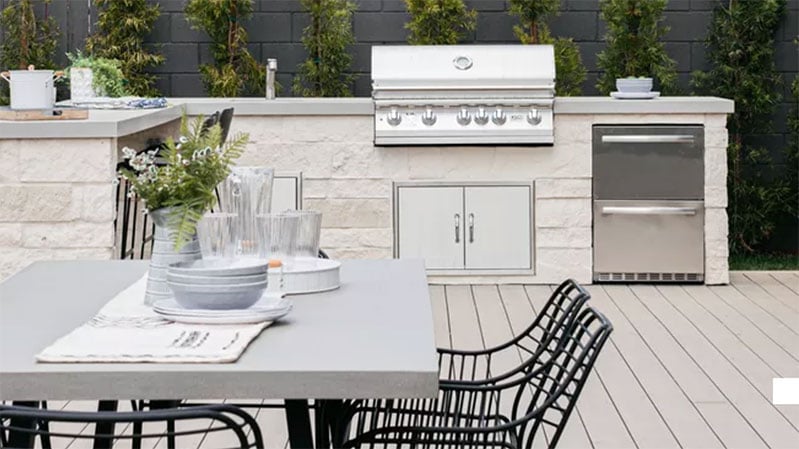
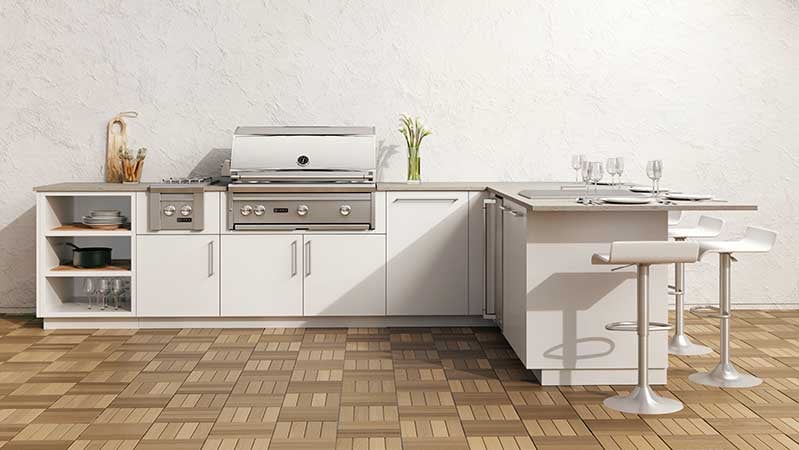
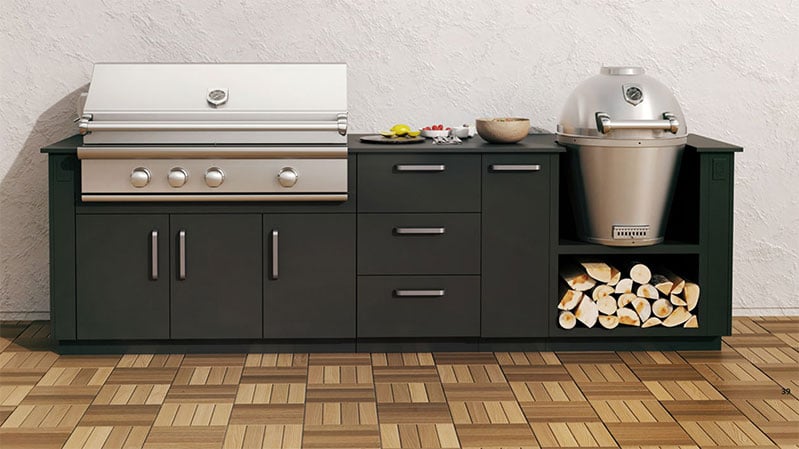
Step 10: Choose the Right Layout
⚡ Quick Answer: Match your layout to your space and cooking style. An island or L-shape suits most backyards, while a U-shape or galley works better for larger, fully equipped setups.
Once you know how you cook and what appliances you need, the next step is the layout. This is where the kitchen starts to come together.
Most outdoor kitchens fall into four basic shapes: island, L-shape, U-shape, and galley.
An island is usually the simplest. It works well in open spaces and is often the best choice if you want something clean and efficient.

An L-shape gives you more separation between cooking and prep. It is often the best fit for people who entertain because it creates a more natural serving area.
A U-shape gives you the most counter space and storage. It is better for bigger projects and for people who are really building a second kitchen outside.

A galley layout can work well if you have the space. One side can be for cooking, and the other can be for prep, serving, or refrigeration.

What to Think About
-
How much room you actually have
-
How many people will be moving through the space
-
Whether you need separate prep and serving zones
-
How close seating is to the grill
-
Whether the layout matches how you entertain
What Can Go Wrong
-
Not enough room between counters
-
The grill too close to seating
-
No landing space near the grill
-
A layout that looks good on paper but feels awkward in real life
For most people, an island or L-shape is the right answer. Choose the layout that fits your space and the way you cook, not the one that looks best in a photo.
Step 11: Choose Materials That Can Have New England Weather
⚡ Quick Answer: Pair countertops like Dekton, granite, or concrete with powder-coated aluminum or marine-grade polymer cabinets for the best durability in cold, wet, and coastal climates. Avoid quartz, limestone, and fragile tile outdoors.
This is where outdoor kitchens either age well or start looking tired fast.
You need materials that can handle rain, direct sun, winter, and in some places salt air. That matters a lot more here than it does in warmer climates.
For countertops, look at materials like Dekton, granite, stainless steel, and concrete. Those tend to hold up better outdoors.
Be careful with quartz, limestone, and fragile tile. Some of those materials can fade, crack, or wear badly outside.
Cabinet materials matter just as much. Powder-coated aluminum, marine-grade polymer, and better stainless steel are usually safer choices.
You have great out-of-the-box, weather-resistant solutions like Urban Bonfire and Challenger.
If you are near the water, this matters even more. Salt air can beat up the wrong material in a hurry.
What to Think About
-
How the material handles sun, rain, and winter weather
-
Whether it will hold up near the coast
-
How much maintenance it needs
-
Whether it is made for outdoor exposure
-
How it will look after a few seasons, not just the day it is installed
What Can Go Wrong
-
Fading or cracking surfaces
-
Rust and corrosion
-
Materials that look good at first and age badly
-
Too much maintenance on finishes that were never a good fit
Choose materials for your climate, not just the photo. In New England, that matters.
Step 12. Tape the Layout Before You Build It
⚡ Quick Answer: Mark your full layout on the ground with tape or chalk, then simulate cooking, opening doors, and moving through the space. Five minutes of testing can prevent thousands in rework.
This may be the smartest cheap step in the whole project.
Once you know the layout, tape or chalk it out in the actual space before anything gets built. Walk it like you are really using it.

Open the grill. Turn to the prep area. Pull open a refrigerator door. Picture people walking by with plates and drinks.
That is how you catch problems early. Something that looks great on paper can feel awkward in real life.

You may find the grill is too close to seating. You may realize there is not enough room between counters. You may see that a refrigerator door opens into the traffic path.
It is better to find that out with tape than stone.
What to Think About
-
Walking space between counters and seating
-
Grill clearance and landing space
-
Refrigerator and cabinet door swing
-
How people move through the area
-
Whether the layout feels natural when you act it out
What Can Go Wrong
-
Tight walkways
-
Awkward traffic flow
-
Doors opening into each other
-
A layout that works on paper and fails in real life
Tape it out first. Walk it before you build it.
Looking for answers about BBQ Grills?
Short on time? Download our free BBQ Buying Guide.
Final Takeaways
A good outdoor kitchen is not about packing in every feature.
It is about building the right space for the way you cook, the way you entertain, and the way you actually live.
Start with a real plan. Centralize the grill. Think through weather, utilities, lighting, ventilation, and materials before you fall in love with the extras.
Then buy the appliances and features you will really use. That is how you end up with an outdoor kitchen you enjoy instead of one you just paid for.
You can see grills, refrigeration, and outdoor kitchen products in one of our six showrooms in Boston, Framingham, Hanover, Hyannis, Nantucket, or Norton. We deliver, install, and service with our own team. Click here to schedule an appointment.
Additional Resources
Hey, what separates the amateurs from the pros in the grilling world? Knowledge. And our BBQ Grills Buying Guide is packed with it.
We're talking insider insights on brands like Lynx, Hestan, DCS, and Kalamazoo.
Plus, we break down grill types - gas, pro-gas, ceramic, pellet, charcoal - and show you how to design an entertainment area that wows.
Over 1 million readers have already leaped. Ready to join them? Download the guide now and see the difference it makes.
Related Articles:
Looking for answers about BBQ Grills?
Choosing a new grill can be a confusing and time-consuming experience. We've taken the pain out of the decision process with our BBQ Buying Guide.
Why Should You Trust Us?
It seems that every appliance review has nothing but glowing comments about almost every product, yet you read customer reviews and they are almost universally bad.
We are here to fill in the disconnect. We'll give you the best features, and the drawbacks as well, including reliability based on over 37,000 calls performed by our service team just last year. Our goal is to give you ALL the information so you know what's right for you.
Please consider subscribing or adding to the conversation in the comments below. We appreciate you stopping by.
A Note About Pricing
Pricing on this blog is for reference only and may include time sensitive rebates. We make every attempt to provide accurate pricing at time of publishing. Please call the stores for most accurate price.